I know that every single blogger out there who shares their Project Life spreads does a post like this near the end of the year, I figured I might as well jump on that bandwagon too. I've been browsing a few blogs to see their plans, and I've picked up a few ideas that I'd like to use next year. One of my fave creative people shared her goals recently, and inspired me to share some of my own! Kellie over at Give a Girl a Blog makes some amazing layouts, and stamps. She's such an inspiration, and I'm so excited to receive some of her stamps soon!
1. Stay in one 12x12 album (if possible). Our lives aren't "exciting" and I don't want to add in all the fluff that we had this year. I also want to try and keep the amount of albums I'll need to store in the future, as small as possible, but I'm in love with mini albums, so that might be a little tough.
2. Use my stash more. I have way more core kits than I'll ever use in this lifetime, and I'm considering separating out 1/3 of each of them to sell/share with family & friends who want to start Project Life, without getting overwhelmed by a whole kit. That being said, even after I separate out 1/3 of what I can, I'll still have so many cards leftover to get me through more than a year.
3. Jon's perspective. I want to include more of his memories, feelings, photos, etc. no matter how bad I may look in some of them. He hardly ever takes pictures of things, but I want him to start because this is OUR life, and I want more of him to be included in it. If he says no, I'll respect that, but I'd like him to say yes.
4. Selective photos. I want to be more selective when choosing photos to include. This year I included basically all the photos I took, which led to us having 2 albums for the year. If a particular spread is only one page long, and another is several pages long, I want to be okay with that. This is our life and some things will have a ton of photos, while other things may not have a ton of photos.
5. Design A pages. I want to continue to use Design A pocket pages. I love the consistency in using the same style throughout, and adding in a few inserts here and there when needed, regardless of the style.
6. Stress less. This year I mostly kept up with my weekly spreads, however sometimes I fell behind, and because I generally tried to keep a few short notes about each day/week, I was able to quickly catch up. I used a set of planner pages from a site that exists no longer, but these ones from A Vegas Girl at Heart are perfect for any Project Lifer, regardless of the design you use. I love that at the bottom it has space for you to draw the design of your pages and plan where things will go.
7. Go with the flow. Previously, I would have stressed a bit if I didn't take a photo from a particular event, and I'd try and find one that someone else took and I could use. In 2015, I would rather just enjoy the moment, and journal about it later, than worry if I didn't get a photo from it.
8. Start & end date. This year I started on the 1st of January. Next year, my plan is to also start on the 1st of January. I know that this means I have a half week ending this year, and a half week starting next year, but it's important to me, to keep the month of December together, as well as the month of January. Though this might change when it reaches the end of the year.
9. Weeks. If I do next year on a weekly spread basis, like I did this year, I'm changing my weeks from Sunday-Saturday, to Monday-Sunday. There were a few times that we went somewhere for the weekend and the trip was split in two because of my week set up. I was fine with it, but I think I'll make the switch to Monday-Sunday for the ease of documenting it. It'll also make it easier to find calendar cards, and I can stop altering my planning pages.
10. Mini Albums. This year I did the 30 Days of Me album, I plan to do it next year as well, around the same time. I'm undecided on whether or not I want to do a separate December Daily album, however this year I'm doing some fancy December pages in my regular album, thanks to some inspiration from Andrea over at Retrohipmama.
I'm sure as I get closer to next year, I'll think of a few more things that I want to add to this list, or change on this list. But I figured that a short list of Project Life goals would help some of you with your spreads, and inspire some of you to consider things you do and don't like about your current way of documenting your memories.
Have a great day!!
-Alexandria
Recent Posts
26/11/2014
25/11/2014
Project Life: Week Forty
If you saw my previous post today, Week 39, thanks for coming back to see this one. If not, just scroll down to the next post, and enjoy! In this post, I'm sharing Week 40. This week we had an early Thanksgiving dinner with my family, because Thanksgiving weekend work was having their "Grand Re-opening" and we knew we wouldn't be able to make it to Thanksgiving with my family (but somehow made it for dinner anyways).

Here's my spread for Week 40. The temperature started to drop this week, it was the start of October, and we were doing a lot of prep to get work ready to open at the end of the week. I hosted Thanksgiving, started my 100 Happy Days album, made waffles, and fall themed papercrafts. It was a busy week.

Here's the left side of my layout. I really wanted to use the "take a hike" card from Studio Calico, so I made it work. I added a phrase sticker from one of the kits, "bright mornings, sunny days & warm nights". Essentially my goal was to make it say "take a hike bright mornings, sunny days & warm nights" and beside the phrase sticker I wrote "sweater weather is better weather".

Here's the front of the insert. The top photo, was a hilarious
coincidence. I was sitting in the car while Jon got the mail, and since
we were out and about, I snapped a photo for the Instagram photo
challenge I was doing, and after I took the photo I realized how many
minivans were in the photo. There's an entire row of them, and in front
of us was another minivan. It was funny to me, so I included it. I love the pumpkin card from Studio Calico. I am glad I live in a world with Octobers, cooler temperatures, beautiful changing leaves, and pumpkins!

Here's the second half of the layout. Lots of pumpkins, and crafty goodness.

Here's the back of my insert. I was working on some last minute scrapbook pages for work (all those hunting layouts I made can be found here). I also made waffles, which were amazing as always! The card on the bottom is from Studio Calico. I thought it was fitting since we were celebrating Thanksgiving this week. I might go back and add a few things we're grateful for.

Here's the right side. Those little paper pumpkins before and after they became a garland. My very first attempts at pumpkin pie (it was so simple, even though I don't eat pumpkin pie), and of course my little fall display. Isn't it just beautiful?
Thanks for coming to check out my spread for week 40!
Have a great day!
-Alexandria
Project Life: Week Thirty-Nine
My intention had been to post this last week, on Thursday, but I was so busy Wednesday while the sun was up, that I didn't get a chance to photograph it, so today I'm sharing two weeks. Right now I'm sharing Week 39, and a little later (around noon MST) I'm also sharing Week 40. I understand I could have put them into the same post, but as a reader of blogs, I actually prefer to see each different week in different posts. I have no idea why, I just do.

This week I used up some more Studio Calico cards. I start to make a dent in them, and then another kit comes and I have a ton more cards. Luckily though, I think I'm making my way through some of my core kits as well.

Here's the left side. Jon made brownies this week, which was kind of monumental because before we started dating, Jon knew how to cook the few foods college kids would eat (macaroni & cheese, instant noodles, etc.), and now he's making brownies unprompted.

This week I used up some more Studio Calico cards. I start to make a dent in them, and then another kit comes and I have a ton more cards. Luckily though, I think I'm making my way through some of my core kits as well.
Here's the left side. Jon made brownies this week, which was kind of monumental because before we started dating, Jon knew how to cook the few foods college kids would eat (macaroni & cheese, instant noodles, etc.), and now he's making brownies unprompted.
Here's the right side. I caught Gracie sleeping in her diving position again, and got a photo of it this time, I took a candid photo of Jon making dinner. I was working on this spread and he saw the picture and went "when did you take that one?" He was making dinner and pudding for dessert (isn't he just the greatest?). I was hanging out with socks one morning and eating a granola bar, and he decided that the wrapper looked like something he could chew on, and then he got tired of that and stretched out across my legs.
That's all for this spread, make sure you come back later today to see Week 40 as well.
Have a great day!
-Alexandria
24/11/2014
DIY Christmas Ideas
Good morning! Today I'm sharing a few Christmas related projects that I want to try out this year. As a creative person, I prefer to make things if I can, as opposed to buying them pre-made. Things don't always work out when I do them myself, but the point is that I at least try and do them myself, so that has to count for something right?
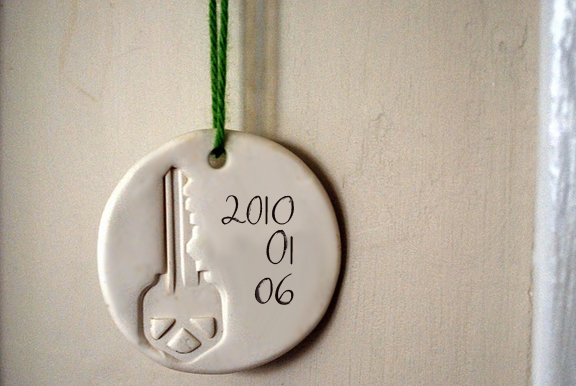
 First up, is this first home ornament from Dollar Store Crafts. Last year my mom gave us an ornament for our first home, but after I saw this one with the imprint of the key to the first house, I knew it was something I wanted to try. Even if it doesn't end up on the tree, but instead goes into our Project Life album, I'd be totally okay with that. I think it'll be fun to look back at the imprint of the key to our first home.
I don't have a photo for this next one, but how about a this paper tree from Love Taza. She uses old music paper, but I think I'd use old book paper. I saw another one on Pinterest that had the same idea but they used leftover scrapbook paper.

I tried to make a couple of these last year, unsuccessfully. A few things I learned in the process include: use regular paper, no cardstock. It's too thick to curl nicely, it just bends. Perhaps measure and draw lines to cut because I can't cut straight to save my life. And of course, take your time.

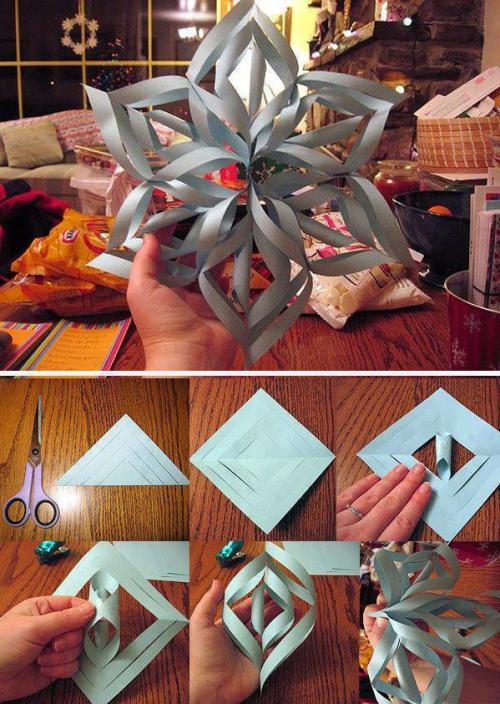
I love this simple snowflake from The Ballard Bunch. It's so simple, and so pretty that I could easily whip one (or several) up in an afternoon.


I don't have a photo for this next one, but how about a this paper tree from Love Taza. She uses old music paper, but I think I'd use old book paper. I saw another one on Pinterest that had the same idea but they used leftover scrapbook paper.
I tried to make a couple of these last year, unsuccessfully. A few things I learned in the process include: use regular paper, no cardstock. It's too thick to curl nicely, it just bends. Perhaps measure and draw lines to cut because I can't cut straight to save my life. And of course, take your time.
I love this simple snowflake from The Ballard Bunch. It's so simple, and so pretty that I could easily whip one (or several) up in an afternoon.
Last year I found these Cinnamon Ornaments from McCormick and I had planned to make some, but never got around to it. Perhaps this year, I'll get my niece to help me, and send a few home with her.
I first came across this tree on Pinterest, and knew I was going to make some for our little Christmas display. I found a tutorial on Trocas De Linhas. It's not in English, but the photo instructions make it pretty easy to follow, or you could use Google Translate to make it English. I have all the supplies for his one, I just need a bit of time to get it done!

I found this beautiful Star Garland by Mollie Makes. It would be an adorable addition to a simply wrapped gift, or strung in a window. It's so simple! Now to find myself a small star cookie cutter so I can make it!
Of course, not everything I want to make is for decoration. Some of it can be for eating!

Baked by Rachel has a recipe for Pepermint Bark. It looks delicious! I usually buy Almond Bark from a family friend who sells it at the local Farmer's Markets. It's delicious and I can never seem to get enough of it! Now I can mix it up and make some Peppermint Bark, or use this recipe to make my own almond bark!
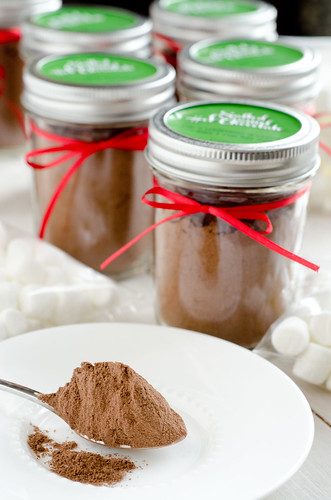
Salted Caramel Hot Chocolate from Seated at the Table. I love hot chocolate and salted caramel, so the two of them together is possibly the best thing ever made!
I doubt I'll make it through all of these things, but I'm sure going to try and get through most of them. If I make anything from this list, it will at least be the string tees, and I will cross my fingers that they turn out how they look in my head.
Have a great day!
-Alexandria
21/11/2014
Studio Calico: Poet Society Card Kit
Today I'm sharing the cards I made using the Poet Society Card kit, and the Jar Stamp Set add on, the 4x3" Circles Stamp Set by Splendid Fiins, and the stamp from this Project Life Add-on Yeats. This is the first time I've purchased add-ons for either Project Life or Card kits, and I ended up making almost twice as many cards. I had so much fun trying different things with the stamps in this kit, and of course the member gallery was overflowing with great inspiration! I imagine these are stamps that I'll use again and again in the future!

First up, a card I made using the Jar stamp set. The one thing I dislike about it, is that the stamp for the jar is just the outline, there's no center part to help it keep it's jar shape. I'm okay with my jar having curves, it adds character to it. The "a pint of thanks and a quart of gratitude" portion was made to fit inside the jar, and it's the whole reason I love this stamp set so much. Not to mention the jar stamp would be beautiful for tags on canning that you were gifting, or selling.
I stamped this on the blue/white stripe paper, stamped the hearts in the jar in a variety of colors, then added the sentiment over top. I used the circles stamp set to add a bit of interest to the background, and tied some crochet cotton around the top of the jar.


I wanted to use the sentiment from the Jar Stamp outside of the jar as well, so I stamped it on a tag. My one goal is to use at least a small portion of each paper in the kit, and given that I was stumped by the diamond paper, I added it behind the tag to make the tag stand out against the background paper.


Here I used the stamps from the Yeats add-on. I love this Cyan color so much! I want to use it for everything I possibly can. I also added some little of the star gems, and a heart stamp. This was so obviously inspired by the member gallery because I don't think I could have come up with something so pretty on my own.


I wanted to use the Circle stamp with a hear in it as a background because I feel like one heart isn't enough. I randomly stamped them all over this card, and added "with love" in my favorite cyan color, and called it done.


I saw a card in the member gallery, that was similar to this, but it had stitching on it. I tried to machine stitch something similar, but it didn't turn out, so instead I drew lines to make the "hey" look the opposite of the rest of the card.


This card happened somewhat by accident. (It happened after the faded gem card), In the member gallery is this card, and I wanted desperately to try something similar. At first the colors I used, didn't work AT ALL. So I stuck with one color and used multiple shades of it to make it a monochromatic ombre. I trimmed it on an angle, mounted it on the grey paper, and added some crochet cotton.


Another card inspired by the member gallery. Didn't quite turn out how I wanted, but I wanted to try and make use of at least one of those plastic gems, and a wood veneer.


I hate this card so terribly much. But I included it because I know there are going to be those cards that you hate beyond words, but at the same time, you made it, and perhaps someone will like it....or not, and that's okay too. I'm not even quite sure what I was going for when I made this, but I don't think it was what it ended up being.


This was the first card I made with the kit. I was so excited about the gems, and there were like a dozen cards in the member gallery that did something similar to this, so I just had to try it. I love how it turned out!


Another card that I don't like. I trimmed the first page of the paper stack, you know the one that shows all the papers and who made them. I trimmed it so I had a small portion of each of the papers and made it a banner, and adhered it to the bottom, but it looks like it doesn't belong because it goes with nothing.


This happened completely on accident. I stamped the purple one first, and the bottom half didn't stamp quite as dark as the top half. Then I got the idea to make two-tone gems!

I added ink to the top half of the gem in a darker shade, and the bottom half got a lighter shade and then I stamped it. I made sure the ink overlapped a little bit to get the full fading effect. To do this with three colors (like the hooray card from earlier) you start at the top and stamp about half of it with the darkest color. Then you stamp the bottom, going a little above the halfway point with the mid-tone color, and then stamp the bottom portion with the lightest. You can also do this the opposite way, or with completely different colors.


I used the little diamond stamp to make a background, and stamped "you're a gem" with silver ink on the blue paper, and attached it to the grey/white stri[e and adhered both to the card with foam squares.


There were so many papers in this card kit, that I knew I could never use them all, but this card helped me make use of a few of them. I love the colors of this card and how simple it is.


Originally this card just said hello. But Jon told me it was missing something, so I added the lines to the bottom, and the extra sentiments.


My favorite card from this kit, (aside from any using the jar stamp). I love the blog of papers in the middle so much.

Thanks for coming by to see these cards I made. I hope they inspire you to make a bunch of cards. Now I wish I had some time to work on more cards, perhaps unrelated to the card kits.
Have a great day!
-Alexandria


