Recent Posts

Showing posts with label acrylic stamps. Show all posts

01/12/2014

Simple Stamped Greeting Cards

Today I'm sharing some simple cards I made using some stamps I have from Studio Calico. I keep buying stamps, putting them in a pile and then never using them. I made it a point to try and use some of them in different ways, and make a few simple cards with just stamps. I'm pretty pleased with how they turned out.


This card was made using this stamp set from Studio Calico. Unfortunately it's sold out, but It's so cute! I wanted it to just be simple, so I stuck to two sentiments and the tomato stamp. I love that it comes with the little face stamp, and a die so you could cut it out after you stamp it.


Pears don't really have one color, but it was nearly impossible for me to get the yellow-y/green color of the pear without it looking like a pile of poop. I added a simple "perfect pair" sentiment, but the addition of a "congratulations" would also have been a nice addition.


This card was made using the stamp set from this add-on, also from Studio Calico. I stamped the hello circle, and then took the "one thousand good night kisses" stamp and a scrap of cardstock that I cut to fit over the sentiment, and stamped the circles around the hello. I added some Heidi Swapp mist to finish off the card.


I used the triangle stamp from the stamp set above, and a thank you stamp from my stash to create this card. I love that the thank you stands out against the simple background.

Thanks for coming by to see these cards. I hope you liked them.
I'd love to see what you do with just stamps. Feel free to leave links to your projects in the comments!

Have a great day!
-Alexandria

30/04/2014

More Crafty Goodness

So before I go on a no new craft supplies summer (worst idea ever I'm sure), I filled a shopping cart on Two Peas in a BucketFreckled Fawn, and both of them arrived on Monday, and I was so excited to share my haul with all of you, that I moved around some posts I had planned for later this week so I could share my excitement with you.


I shared this photo on Instagram Monday morning after my packages arrived. I couldn't wait to tear them open and see all my pretty goodies!


I opened the box first (of course), and this was what greeted me. There was paper placed on top to keep things from shifting around too much. The box weight 19lbs, so I think I got a lot of stuff.


Instead of tackling the giant box of goodies, I started with my slightly smaller package from Freckled Fawn. Inside was a bunch of wood veneers, and these three stamp sets. I will definitely be ordering their stamps again in the future. Aren't they just the cutest?!


I ordered two of each package of wood veneers because I have a very strong feeling that I'll be using these A LOT in the future. They're just the kind of simple embellishments that I needed for my PL pages.


Then I pulled everything out of the box and laid it out on my desk. There's such a variety here, and I'm sure I won't need to buy anything else for a while.


Of course I bought a variety of Studio Calico wood veneers. I bought one of each of these.


I'm a sucker for stamps. The two sets on the left are from Technique Tuesday by Allie Edwards. The set on the right is by Allison Kreft.


I bought two Elle's Studio sets, the far left is 100% Sweet Stamps, the second is from the Serendipity line, next is Happy Place "Home" by ChicTags, and a set by Evalicious (which I only recently discovered), you can find her shop (here).


Doodlebug sequins were a must have for me, and are what started this whole thing. I wanted to make some sequin pockets (which are really popular) for my PL pages, so I bought a bunch of sequins, and I'm waiting on some vellum from Studio Calico.


I've recently developed a love of thickers, so I bought some Dear Lizzy Thickers. They're gorgeous.


Here's a close up so you can see the difference between the three sets. The set on the left has navy dots, the middle set has white dots and the set on the right is covered in aqua glitter.


The bottom set of stickers is from Studio Calico, and the top set is Close Knit.


Baby stickers by Studio Calico. The far right set are vellum stickers.


The far right is Pebbles: Love You More journaling and filler cards. I saw them in a  Youtube video on Two Peas' channel, and thought they were just the cutest! In the middle is Dear Lizzy title cards, just 6 3x4 cards for Project Life. On the right is embroidery thread by Amy Tangerine.


On the left are Crystal Clear Sequins by Jenni Bowlin. In the middle is some Cut & Paste enamel stickers by My Minds Eye. One of my favourite lines by them! On the right is some chalkboard die cuts from Studio Calico.


I'm so in love with the Cut & Paste line from My Minds Eye that I bought both 6x6 paper pads, and the chipboard stickers.


These stickers are Sundrifter by Studio Calico.


Here's a variety of 12x12 sheets I ordered including, Dapper Dan by Glitz Design (mustaches), a couple pages from Cut and Paste by My Mind's Eye, some Maggie Holmes and Dear Lizzy paper as well as some rainbow chevron vellum.


I got the MME (My Mind's Eye) 6x6 Chalk paper pad and the Story Time paper pad by Studio Calico. I loved the colors and I make a lot of baby themed things for family and friends.


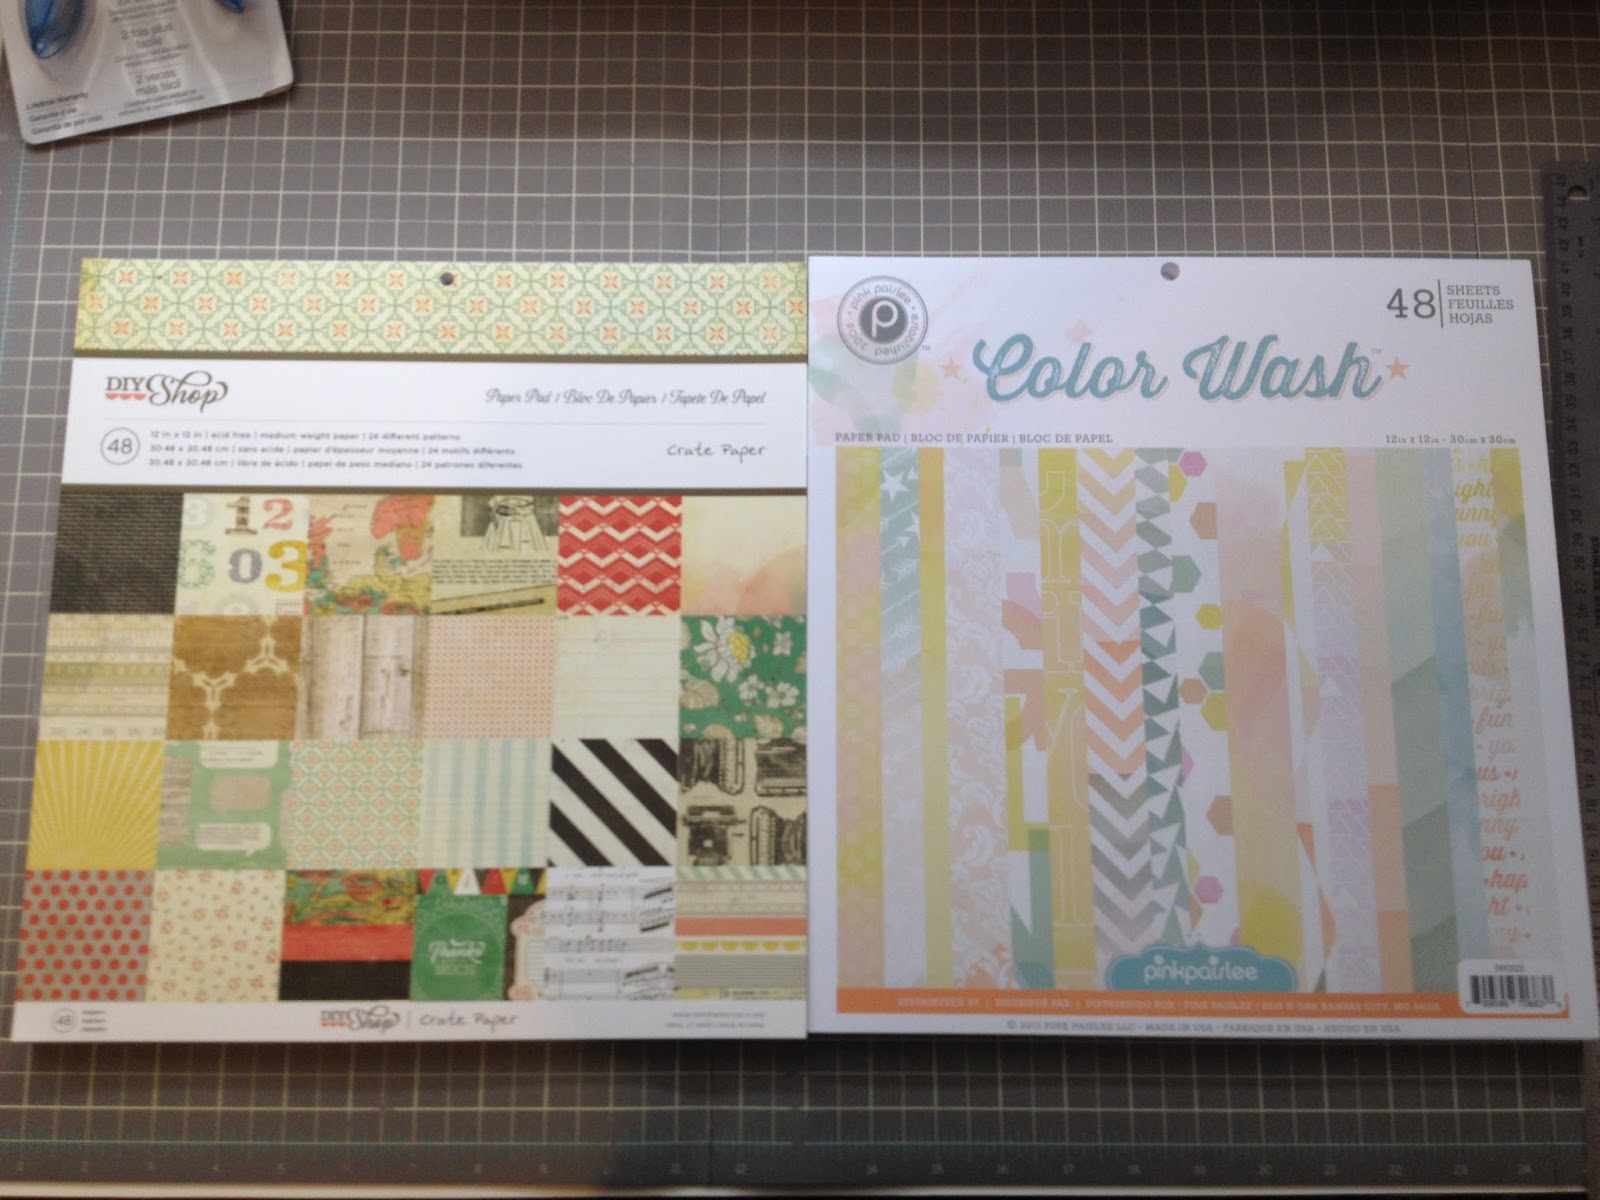
I picked up a few 12x12 paper pads as well. The left is DIY Shop by Crate Paper and the right is Color Wash by Pink Paislee (my favourite!).


I bought the Dear Lizzy Neapolitan 12x12 paper stack as well, and the Atlantic paperstack by Studio Calico.


Maggie Holmes and Wanderlust by Studio Calico 12x12 paper stacks.


Dear Lizzy: 5th & Frolic Collection Pack. There wasn't a 12x12 paper stack available, so I got this instead. It has a variety of papers that match the Project Life core kit, and some black glitter thickers.


Because I ordered more then $1 in physical product they sent these free gifts. I don't think I'll ever use the punch, so I'll probably put it into my pile of supplies to sell. As for the canvas, I have no idea how I would even use it, but I might hold onto it until I figure it out.

Now I just need to wait for my photos from Persnickety Prints to come in so I can put some of these beautiful supplies to use and work on the last two years, then I think I'll offer to do some albums for family (heritage, a travel album for my grandma, and various albums of photos from my childhood and my siblings).

Have a great Wednesday!
-Alexandria

03/12/2013

Acrylic Stamp Storage Idea

Alright, so as many of you know, I have a lot of stamps. Some of you saw my posts on Instagram when we were moving that I didn't realize how many stamps I had until I had to pack them up (it was like that for the majority of my supplies). Shortly before we decided we were moving, I had been looking into different storage solutions for my acrylic stamps because my collection was growing quickly and the way I'd been storing them at the time (a couple of boxes), started to not be enough space to hold them. I needed something that I could easily expand if my collection grew any more (it's still growing).

I scoured Pinterest and there were some wonderful ideas, but one that stood out was to put them into pocket pages and put them in a binder. At first I thought that was kind of stupid. How would you remember which stamps were grouped together? What would you do with all those acetate sheets from them?

Then I realized I was being an idiot. I started out by buying a whole bunch of 8 1/2 x 11" pocket pages. Terrible idea. Pocket pages come in a variety of sizes, you just have to know where to look. So I went to staples again and looked at all the pocket pages they had. They had 8 1/2 x 11, baseball card (9 - 3"x2" slots), and business card holders (way too small for any stamp sets I own). Then I wandered to the Martha Stewart section and they had a set with two pockets on an 8 1/2" x 11" sheet, and one with four pockets. Those are the ones I used the most of. The majority of my stamp sets fit into one or the other. I also have a large collection of little $1 stamps from Michaels (the little set of one or two stamps) and those fit nicely into baseball card pages.


Here's the four binders that hold the majority of my Acrylic Stamps. I still have some that I need to unpack from the grab box which is still sitting on the floor in the craft room full of things I need to put away. (The brown binder is actually a photo album, but it works just as well).


I labelled them with sticky notes because I've been rearranging different groups of stamps to make the binders mostly equal. For example, I have a lot of Christmas stamps, but not many Birthday stamps, so I've moved them into the same binder because they don't overflow it.


I placed dividers into my binders to put more distinction on the sections. They don't stick out past the pocket pages, but they still allow me to keep things a little more organized.


Here's a photo of the Martha Stewart pocket pages with 2 pockets. Most stamp sets will fit into this size of pocket page, as you can see they're pretty wide and my Recollections font sets aren't very big.


Here's an example of the Martha Stewart 4 pocket pages. They fit most of my slightly smaller stamps in them. The ones that didn't fit these pockets went into the two pocket pages. 


Here's one of my baseball card pages full of $1 stamps from Michaels. They fit almost perfectly, some of them I had to trim down to squeeze them in, but they still fit nicely and I can see them better this way.

I'd love to see how you organize your stamps! E-mail me your Stamp Storage photos creationsbycoal@gmail.com

Have a wonderful Tuesday!
-Alex

20/06/2013

Stamps, Stamps, Stamps

I got my stamps from Peachy Cheap in the mail today! I was super excited to get them. I almost forgot that I had ordered them, but I'm glad I did. They're ideal for scrapbooks or Project Life.


Here's a photo of all three, I took closer photos of each set so you could see them better.


I like the detail on these, and that there's a little space on the two on the right to put little notes. 


I love the box on the right. You could use it for anything. It would be great for small to do lists or little notes.


I bought a few Stampin' Up stamps a couple months ago that were corner stamps. They're so handy! Sometimes you just want to put the sentiment on the corner.

That's my stamp haul from yesterday. I have a bunch more things coming in the mail from both Peachy Cheap (here), Scrapbook Daily Deals (here). Every once in a while Pick Your Plum (here), has scrapbook supplies, but they also have a variety of amazing non-crafty things that pop up on their daily sale. Definitely worth checking out all three of them!

If you know of any other websites with cheap craft supplies that ship to Canada, I'd be more than happy to take a look at them!

Have a wonderful day!
-Alex