Recent Posts

29/01/2014

Multiple Pocket Photo

Good morning! Hope You're all having a wonderful week. On Friday I'll share my completed album from my Vancouver trip, but today I'll share how I made my multiple pocket pictures.


I've seen similar things in other people's posts about their albums, but it took me until I started planning my album to figure out how they did it. You just get the photo printed large enough to fit in all the pockets and crop it accordingly.


This is the first page of my album. I knew I wanted to start it off with a group photo (I used a lot in this album). 


I chose this photo. I ordered it at 8" x 12". The space is only 6" x 12" so I had to trim it down accordingly.


On the back of the photo, I drew the lines to cut on. I cut two inches off the bottom, and the rest was cut into 3" x 4" photos to fit into the pockets.


I chose to cut the bottom off because no one cares about our legs, but we love the view!


Some of our faces were cut up a little bit, but it still looks good. 


I did another one with this photo of the bridge. This one turned out the best, partly because no ones faces were cut into four. This is one of my favourite photos from the trip. I can't wait to share the rest of my mostly simple album.

Have a wonderful day!
-Alex

27/01/2014

Happy 2nd Birthday!

This card was inspired by another card magazine. I attempted to use some scrap paper from my nearly overflowing box of scrap paper.

One day either my desk will be clean enough to not have clutter in the background of my photos, or I'll go downstairs and use the portable photo studio that I bough Jon for Christmas the year before last. Anyway, here's the card.


This is the piece I struggled with the most. I definitely had to step outside of my perfectionist bubble here, and accept that this ribbon would never look as good as I wanted it to. The circle with the number 2 on it, is from Elle Studio's Day to Day Tidbits


I adhered a scrap piece of polka dot paper and wrapped twine around the card. Stamped happy birthday in the bottom corner (for some reason I gravitate towards the right side).


Here's the side view of the card. The circle of the ribbon was adhered with foam squares and the bottom half of it wasn't adhered at all. I didn't want them to be so one dimensional. I love that not adhering them would add some dimension to the card.

My goal this year is to push myself out of my comfort zone. Do you have any goals in regards to your crafting?

Have a great day!
-Alex

24/01/2014

Get Well Soon

Happy Friday! Can't believe January is almost over already!


This card was inspired by one of my Papercrafts issues. But of course I did my own take on the card.


I traced the green piece with a yellow pen. The yellow strip on the right is washitape. I stamped the flower above the get well soon.


I tied the twine in a bow and used it to hide the seam between the patterned paper on the left and the off white base piece.


Here's the side view of the card. The get well soon is adhered with foam squares, and the twine wraps around behind the off-white piece.

I hope you all have a wonderful weekend! I'll try and make some more non-boring cards and things. I'm also considering bringing back Washitape Wednesday's. Possibly once a month or so. I'd love to hear your thoughts, and I'd also like to use up some more washitape!

-Alex

22/01/2014

Orange You Glad It's Your Birthday?

I'm not one for being creative with post titles (as some of you may already know), but I tried anyway.


I wasn't sure how I felt about this card being monochromatic, but I'm pretty happy with it.


I wrapped orange and white twine around the sentiment, and adhered gems for a little sparkle.


I hate when ink smudges, but I can roll with it. It adds character...right?


Here's a side view. This little card is only 4" x 4". The perfect little size!

Hope you all have a wonderful Wednesday!
-Alex

20/01/2014

Boy-ish Congratulations

Happy Monday! Hope everyone had a good weekend! Jon was gone, so I had plenty of time to catch up on cards, and some organizing.


My goal with this card was to make a congrats card for a baby boy. It's not a traditional baby card, but that's what I love about it. I love that I could take more masculine colours and use them in a way that would work for a baby card, or I could use it for something else male related.


This button wasn't in my original plan, but as I was moving things on my desk I found a button, so I added it to the card. I think it adds just enough embellishment without taking away from everything else.


I decided the keep the congratulations on this card simple (slightly smudged but simple). All the colours were pulled straight from the polka dots. It's easier than trying to find a pattern that has the colours I want in it.


Here's a side view. I used a kraft paper card base because I wanted to switch it up from always using white, but also still be able to write in it.

I'm going to be an auntie to two little babies this year, so I'd like to cover all my bases and make cards for both genders. Hopefully one of them finds out the gender and makes buying them stuff for the baby a lot easier!

Have a wonderful day!
-Alex

17/01/2014

Hugs & Kisses - Valentine's

This was one of my favourite cards that I made last year for Valentine's Day. It was inspired by one I found on the Michael's Pinterest. I improvised it a little bit, and made this lovely card.


 This card is very pink, and girly. I selected the papers for this one very carefully. I wanted them to go well together without being too monochromatic. I think I got the perfect balance.


The ribbon hides the seam between the solid pink piece on the top, and the lighter pink piece on the bottom. The circle with the & on it was tripped on one edge and adhered with a foam square.


I used varying lengths and widths of paper for the banners. I didn't want two strips to be the same. I stamped the sentiment with brown ink.

Here's a side view of the card. This card measures 4 1/4" x 5 1/2". I've used a similar style on other cards that I've made.

Do you usually buy your significant other a store bought card, or do you purchase/make a handmade card for them? Personally, I love handmade cards, but because I make them, my family feels it would be weird to buy one of my cards only to give it right back to me.

Have a wonderful day!
-Alex

15/01/2014

Nuts About You & I Heart You - Valentine's

Valentine's Day is coming up. Instead of making new cards (partly because I hate the holiday), I'm going to sell the a few I made last year. I'll stamp something cheesy inside and lower the price a little bit.

Today I'll share two, and on Friday I'll share two more. I have to work the next few days and due to a lack of inspiration, nothing crafty has been created this week. I did however work at reorganizing the craftroom a little bit, so hopefully photos next week!


Everything on this card was made using one of my Cricut cartridges. I think it was the Create a Critter.


Here's a side-view of the card. It only measures about 4" x 4".  I suppose I could have made it larger and embellished more, but I'm a simple person (or boring, depending how you look at it). 


I used red ink on the edges. The red is layered on top of the white.


The letters on this one was cut from the Cricut as well. I think it was also from the Create a Critter.


The red striped paper is layerd ontop of the black. 


Here's a side-view of the card. This one only measures 5" x 4" or so. I had to make a couple of them smaller so they would fit into the holders that work bought for me to put them into.

Definitely not some of my best work, but last year Jon decided that I should sell cards at work. These were made a week before Valentine's Day, which I consider to be a Hallmark holiday, and insisted that Jon refrain from getting me anything. He does so much for me throughout the year, that I don't need him to spend ridiculous amounts on overpriced chocolate and flowers simply because society says he should.

I hope everyone has a wonderful day. Only another month until the most pointless of holidays, though if you do enjoy it, I apologize if I offended you in anyway. I'll try and get something new and crafty made for next week, but my entire schedule has been off since Christmas and it's taking a while for me to readjust to working and sleeping later than usual.

-Alex

13/01/2014

Rosette Wall Art

As promised last week, here's my post about my rosette wall art. I spent two days scoring, cutting, folding and gluing all of these together. Never again. I couldn't lift my arm by the time I'd finished. Even scoring on the second day was hard on my shoulder. But I've finished it and it looks beautiful!


Looking at it laying on my kitchen floor, I wish my wall was covered in wood. But this is my rosette wall art. I worked so hard on it and it didn't turn out quite how I wanted it to, but I'm still happy with it. I love the colors and patterns.


First up we have one with a more green colour. It goes beautifully with the colours of our living room. I also love the floral pattern on it.


This black and white one is the exact same as the white and black (they're just opposites). I chose them to add more contrast to the overall palette.


This is a yellow-y beige. I added this pattern to tie it all together without overpowering the other colours. IT also matches the colour of the walls in the living room.


This paper tied into the beige-y colour of the first pattern, and I needed more rosettes.


Here's the one that started it all. This is the colour of the blankets we have on the couches (they're white so we put blankets on the seats to keep them white). It's such a beautiful colour.

I also made some silver, gold & black ones for New Years Eve and hung them in our kitchen.


I made two of the one on the left, and hung the one on the right in the centre. 


This paper is silver and white, but its hard to tell unless its reflecting the light.


The small one in the centre is not reflective, but the other two are gold and white.


Here's a better picture of the gold and white catching the light. Everyone thought they were beautiful!

I'd love to see what you do with your rosettes! E-mail your photos to creationsbycoal@gmail.com

Have a great day!
-Alex

10/01/2014

Rosette Making Tips

Tips for making the perfect rosette:

  • Score all of your paper first. I decided on a couple of papers, scored them, then cut them in an assembly line fashion. That way you're not going between scoring, cutting, folding and assembling everything.
  • Decide on the sizes you want your rosettes to be. You need to remember that whatever size you cut your strip of paper, you're finished rosette will be twice that size. If you want a 4" rosette, cut your strips of paper at 2" wide.
  • After folding your rosette, straighten out your folds. When you fold them, sometimes the peaks of your folds don't line up, simply hold it on the table and push so they're straight across. 
  • Before you glue your rosette into shape, test fit it a few times and get the paper used to being pressed down into that shape. Manipulate your paper so you know how you want it to look.
  • Use a larger circle to glue the back to. No one sees the back of your rosette, so they'll never know if your 4" rosette has a 3" circle on the back to hold it into place. It also doesn't matter if your back circle is in the centre, just make sure it doesn't hang over on any of the sides.
  • Roll a piece of tape and use it to stick your back circle to your work surface. This makes it easier to glue your rosette to the back circle. It won't move around, and it's easier to get it close to centre if you test fit a few times before.
  • Allow the glue to set for a few minutes before moving your rosette. If the glue is still soft, there's more chance of your rosette falling apart.
  • Always, always, always, use hot glue to assemble it. If you're using thinner paper you can use a tape gun to put your strips together, but always use hot glue to glue the centre together.
Most of these tips can be found in this Youtube video that helped me become more confident in my rosette making skills


Good luck with your paper rosettes! In my next post I'll show you the beautiful rosette's I made for my living room and dining room!
Have a wonderful day!
-Alex

08/01/2014

Vancouver Project Life Album Prep

Almost two years ago, my college class went to Vancouver. It was technically a class funded field trip, but we had some fun doing things aside from touring the Vancouver Convention Centre. I'll talk more about that when I share the finished album in a later post. 
In this prep series. my pages are in a Project Life binder, the finished product will be put into a scrapbook because there aren't enough pages to fill the binder, and they'll fit perfectly into a scrapbook. This prep series is also more about helping you create an album before you print your photos.

I had to go through almost 400 photos and I only ended up using a 156 of them. My photos came from the 100 or so that I took with my iPhone, 300+ photos a classmate took with a camera from the college, and a couple additional photos that a few classmates took and posted on Facebook that helped fill in some of the gaps.

I'm only going to share a few photos of my album, no point overloading you with every picture-less page and ruining half the surprise of the finished product.


It's hard to tell on the right side which journal cards and sticky notes are on that page, but the four cards across the centre are the journal cards for that page, and the top and bottom ones have yellow sticky notes with photo number/descriptions for reference.
The blue sticky notes on every single page are there to tell me which core kit was used for each page. I didn't use the same core kit throughout this album. I used Sunshine, Honey, Blush, Rain, Jade, and Midnight. It's a lot, but sometimes one kit didn't work for that particular open space, or it didn't go with the photos I wanted to put on that page, or it wasn't giving the feeling I wanted it to. 


I ran out of yellow sticky notes, so I used orange. On the left I have a page of strictly photos and on the right I have a page of photos with the exception of one PL card in the bottom left. The pink sticky notes you can see on this page are to mark the places that I need to put a title or fill in journaling of some kind.


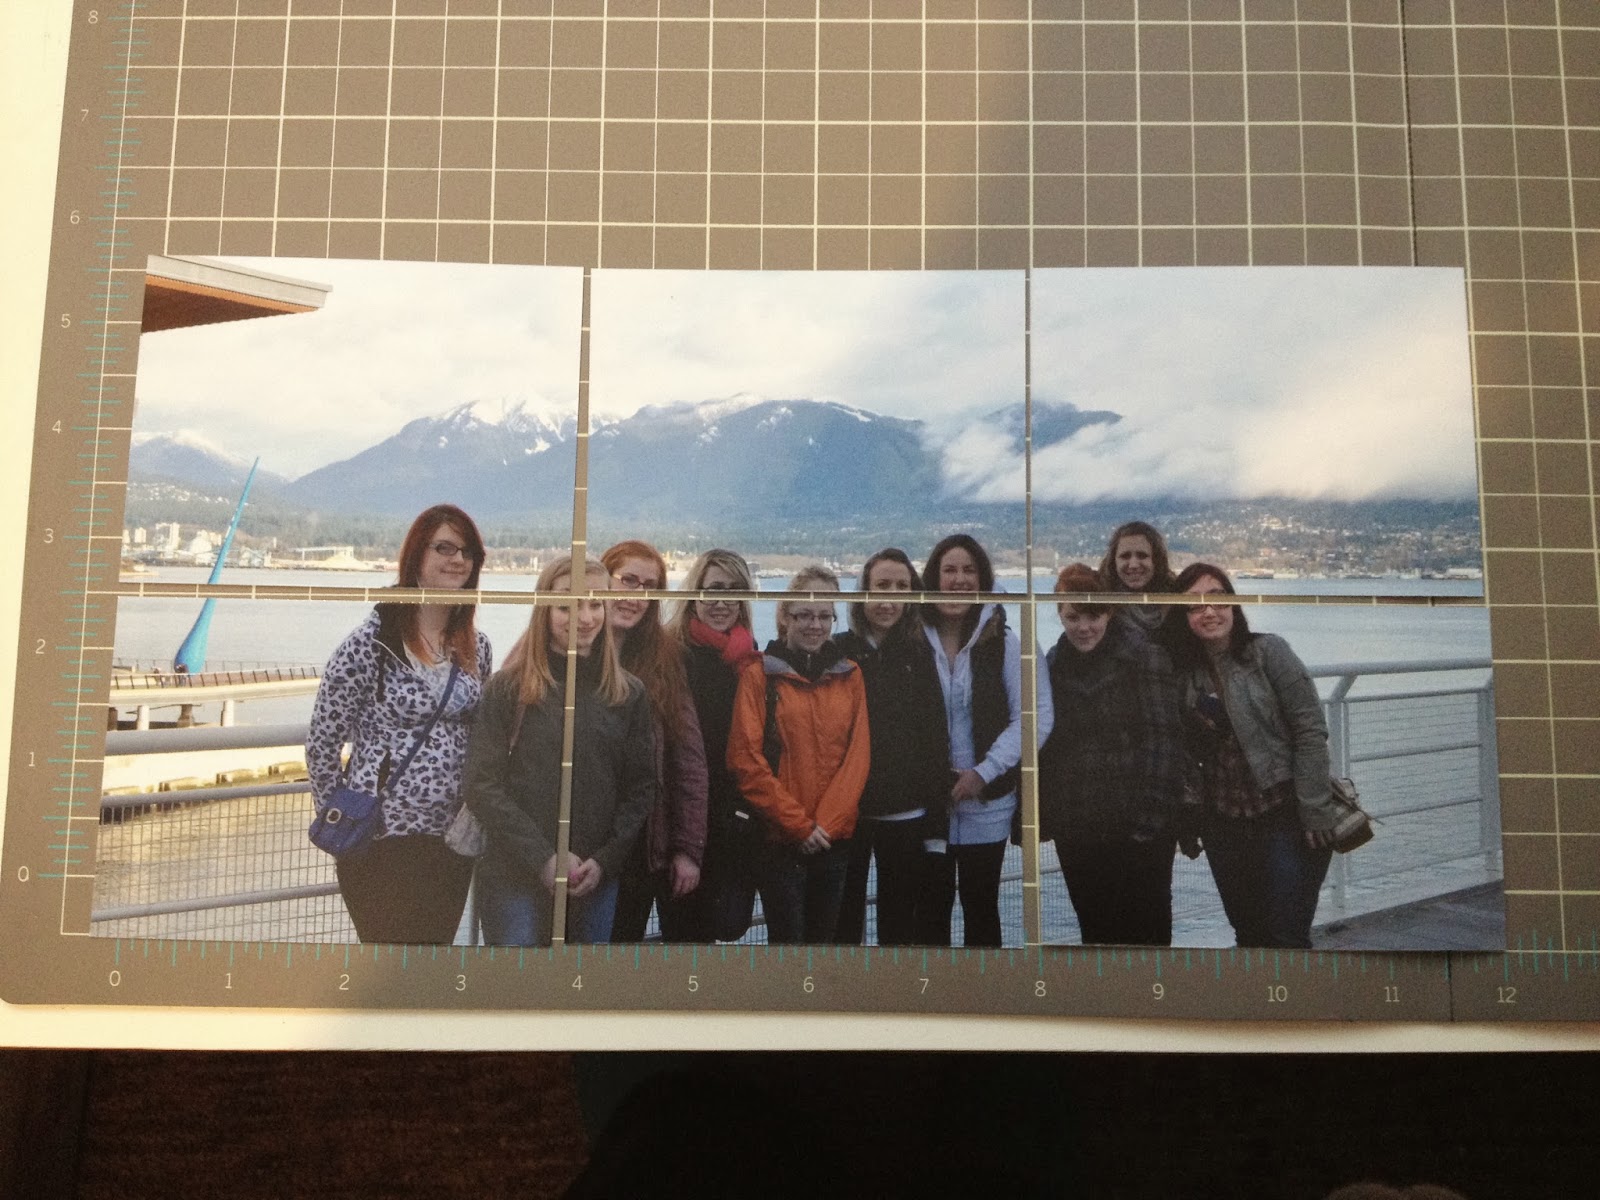
When I get my photos back, I'll do a quick explanation/tutorial about how I did the page on the right. the top two rows of the right page are for one photo. It's a Design A pocket page, but I've ordered a few photos blown up to larger sizes and I'm going to crop them to fit into multiple pockets to create a larger photo made of multiple parts. I've seen them numerous times in other peoples albums, and it took me a while to figure out how to do it. Now that I know what to do, I have it happening a few times throughout this album. Mostly with group photos, and a few signs from places we went that I really wanted to remember.

To keep track of all my photos, I wrote down the number or name on the photo and put it into a folder for the size I wanted it to be. I had folders for 3x4, 4x4, 4x6, 5x7, and 8x12. I also wrote out a list of page numbers and the core kit that I used.

I kept track of everything outside of the album in case I lost one of the sticky notes. It's hard to keep track if you're moving things, but I love that sticky notes can be moved around if you're unhappy with the placement. I moved sticky notes around a lot. I even had to move them to different pocket pages, and I added a few additional pages to get some more photos in there.

I can't even explain how excited I am about this album. I can't wait to get my photos and share this with all of you! Now I need to get week one of my personal album finished so I can keep up with that and share it with you!

I love sharing Project Life with my family/friends. I gave a bunch of it to Jon's sisters for Christmas. My brother and his girlfriend are having another baby so I'm giving it to them as a baby gift. Jon's one sister is also pregnant again, so we're giving her more Project Life for the new baby.

I hope that this helped you get your PL albums organized. I plan to use this technique to work on a few weeks of my personal 2014 album before printing photos.

Have a wonderful day!
-Alex

06/01/2014

Merry Christmas

This year, I sent out three different Christmas cards. A handful of friends got one, half my penpals got another and the other half got another. They're similar, they're just not all as close to the same as I wanted them to be, but that's okay.


This is what I wanted all my cards to look like. Unfortunately, I only made 6 of the trees, and couldn't find all the other ones I had cut out before we moved. I also hate glitter so I didn't want to make more of these.


Instead I found a cute little tree stamp, and used gold ink to stamp trees onto the remaining cards.


These cards I left just like this because I felt the yellow paper was too busy to stamp on top of it.

Unfortunately, I didn't have the supplies or the time to make any other Christmas cards this year, but now that I have a bunch more Christmas stamps and Christmas paper, I might start now and make a bunch of cards for next year.

Hope you all got your cards out on time, mine went out just before New Year's.
-Alex

03/01/2014

Black Friday Online Shopping

Good morning lovelies! My Black Friday orders arrived shortly before Christmas, and another order of washitape that I ordered a while ago. The mail has been slow to get here with everyone's Christmas letters and packages going through the mail.


Washitape is a horrible addiction. I have more tape than will fit into the 20 Recollections racks that sit on my desk. I have a box (from a previous Michaels trip) that holds all my duplicate tapes and new tapes that don't fit into the racks. My goal for the first half of the year is to improve my storage for all of my supplies, and purge the things that I don't use to get some extra money. The tapes on the left I got from Pick Your Plum's Black Friday sale, and the others came from Peachy Cheap.


Here's  my Freckled Fawn grab bag from a while back. I'm super excited about the wood veneers. They're so pretty! I want to get my hands onto some more wood veneers.


I also got an Elle Studio Journaling Cards grab bag from their Black Friday sale. 


These cards are 4x6 and the favorites one has a list of favorite things (color, food, etc.).


Here's more 4x6" journaling cards.


Here's all the 3x4" journaling cards.


The top left and right are circle tags, the centre is Christmas gift tags. The next row has a variety of tags and paper pieces. The bottom row has labels, and tags.


Here's more labels.


They also sent packages of journaling cards. I might end up with a few duplicates, but they're so pretty that's totally fine with me.


On the left, this stamp says date, and on the right it says notes.


The front side of the paper I received.


The back of the papers I received.

Now I just need to find a way to store all these extra journaling cards.
I hope you all got some good things from your Black Friday shopping. I don't normally shop on huge sale days, but I couldn't pass up the Elle Studio grab bags.

Have a great day!
-Alex