Recent Posts

Showing posts with label card kit. Show all posts

25/02/2015

Studio Calico: Walden Card Kit

Good morning! I know this card kit is a little overdue (it was released in November), but sometimes I let my card kits pile up, then pull out a few and work on them over a weekend just to get them off the shelf. In this case, I needed a blog topic, so I worked on this card kit (and the December one).


For this card, I used some scrap pieces, and this stamp from Ali Edwards. I love  thank you cards. There's just something about showing someone how much you appreciate them, even if it's just with a simple card.


I loved the little plastic label-like sentiments that were included in this kit. I used every single one of them!


Inside the little wood veneer arrow, it says "hooray for sweater weather". Jon loves this card, I just wanted to use the orange cloud paper.


I used some scrap strips to look like washitape at the top and bottom of my sentiment. I loved the nuts about you sentiment. I wanted to use the little acorn stamp, but I only have one shade of brown, and it didn't look good all one shade of brown, so I used the nuts about you stamp like this.


I also couldn't get the apple stamp to look like an apple so I just used the "you're the apple of my eye" sentiment by itself. I think it looks fine. I added some diamond washitape along the edge where the papers met to hide the seam.


My favourite card! I love the pale colours, and the wood veneer heart is the perfect size. I wrapped the yellow ribbon around the seam and adhered it to the back of the patterned papers. Still love love love those plastic sentiments.


My favourite paper in the whole kit. I love looking at it. I almost want to make it into wallpaper and make an accent wall with it.


Used some scraps, and more diamond washitape and another plastic sentiment on this card. I love the look of it!

Thanks for coming by to check out the cards I made using the Walden card kit from Studio Calico. I hope you have a great day!
-Alexandria

28/01/2015

Studio Calcio: Underground Card Kit

Good morning! Today I'm finally sharing the cards I made using the Studio Calico Underground card kit. I'll admit that I had planned to do this a lot sooner than now (the kit came out in October), but I would pull out the card kit, and look at the stamp and think to myself "What am I supposed to do with this?" I browsed the member gallery for inspiration, and usually came up empty handed. I don't make cards for Halloween, I wanted to use only the main card kit to make at least 9 cards before I used the add-ons. It definitely didn't work out that way. With the addition of the add-ons I was able to make 9 cards. I could have used the add-on stamps to create more, but I felt that just 9 that I could hopefully use, was better than 15 that will just sit their collecting dust.


The two photos above are from the same card. These little tags were the perfect size to hold a gift card, or some money, so I put a gift card into the top one. I stamped a sentiment above the opening so that when you remove the gift card you can see it.


When I first saw the compass wood veneer, I was thinking to myself "what would I ever use this for?" The member gallery had something similar to this, but I wanted to make a band around the bottom, so I stamped the sentiment in black and green ink.


I made this card using just the stamps. The circle looks like it was supposed to be the outline for the pumpkin, or maybe just an imperfect circle. I had fun creating this card.


I have a container full of flair on my desk, and I try to use as much of the extra embellishments as I can. Originally I had stamped "Darling" directly onto the background, but it didn't turn out so I covered it with a piece of white, and realized the whole thing was a little too close to the bottom, but worked with it anyways.


When I saw the patterned paper I used for this card, I immediately thought of bow ties. Hello Handsome seemed an obvious choice. I used a bit of the copper paper for the sentiment.


I wanted the thanks sentiment to look like it was part of the chevron pattern. The middle one was the one I did first, and it didn't turn out, but I'm pleased with the rest of it. On the top of the tag I stamped "I made this especially for you".
 

I had been browsing Instagram before I made this card and someone made a PL card by repeating a stamp. I love that Darling and one of the I miss you's stand out from the rest.


One of the add-on stamps, was this tea set. It's cute. I love the tea cup and the little teabag. I found a doily in my stash and three tries later, got the tea cup to turn out.


I wanted to quickly use the snowman stamp set as well. So I made a simple two-ball snowman and rubbed a blue ink pad along the bottom.

Does it make me a horrible person that I'm happy to just be finished with this kit? I don't use a kit until I run out of supplies (except once with an earlier kit that I just loved!), so most of the papers ended up in my stash. I can see a paper purge coming shortly.

Thanks for coming by to see these cards. My hope is to make a few cards using my stash. I miss just using my stash to make cards, but if I'm buying the card kit, I'm going to try and make a few cards with it instead of just letting it collect dust on my shelf.

Have a great day!
-Alexandria

21/11/2014

Studio Calico: Poet Society Card Kit

It's really starting to get colder here. I must admit I was excited about winter, because I wouldn't be so warm all the time, but I'm also very much not looking forward to being freezing cold all the time either. I hate socks, but my feet get cold so easily, and when I wear slippers they get too warm.

Today I'm sharing the cards I made using the Poet Society Card kit, and the Jar Stamp Set add on, the 4x3" Circles Stamp Set by Splendid Fiins, and the stamp from this Project Life Add-on Yeats. This is the first time I've purchased add-ons for either Project Life or Card kits, and I ended up making almost twice as many cards. I had so much fun trying different things with the stamps in this kit, and of course the member gallery was overflowing with great inspiration! I imagine these are stamps that I'll use again and again in the future!


First up, a card I made using the Jar stamp set. The one thing I dislike about it, is that the stamp for the jar is just the outline, there's no center part to help it keep it's jar shape. I'm okay with my jar having curves, it adds character to it. The "a pint of thanks and a quart of gratitude" portion was made to fit inside the jar, and it's the whole reason I love this stamp set so much. Not to mention the jar stamp would be beautiful for tags on canning that you were gifting, or selling.

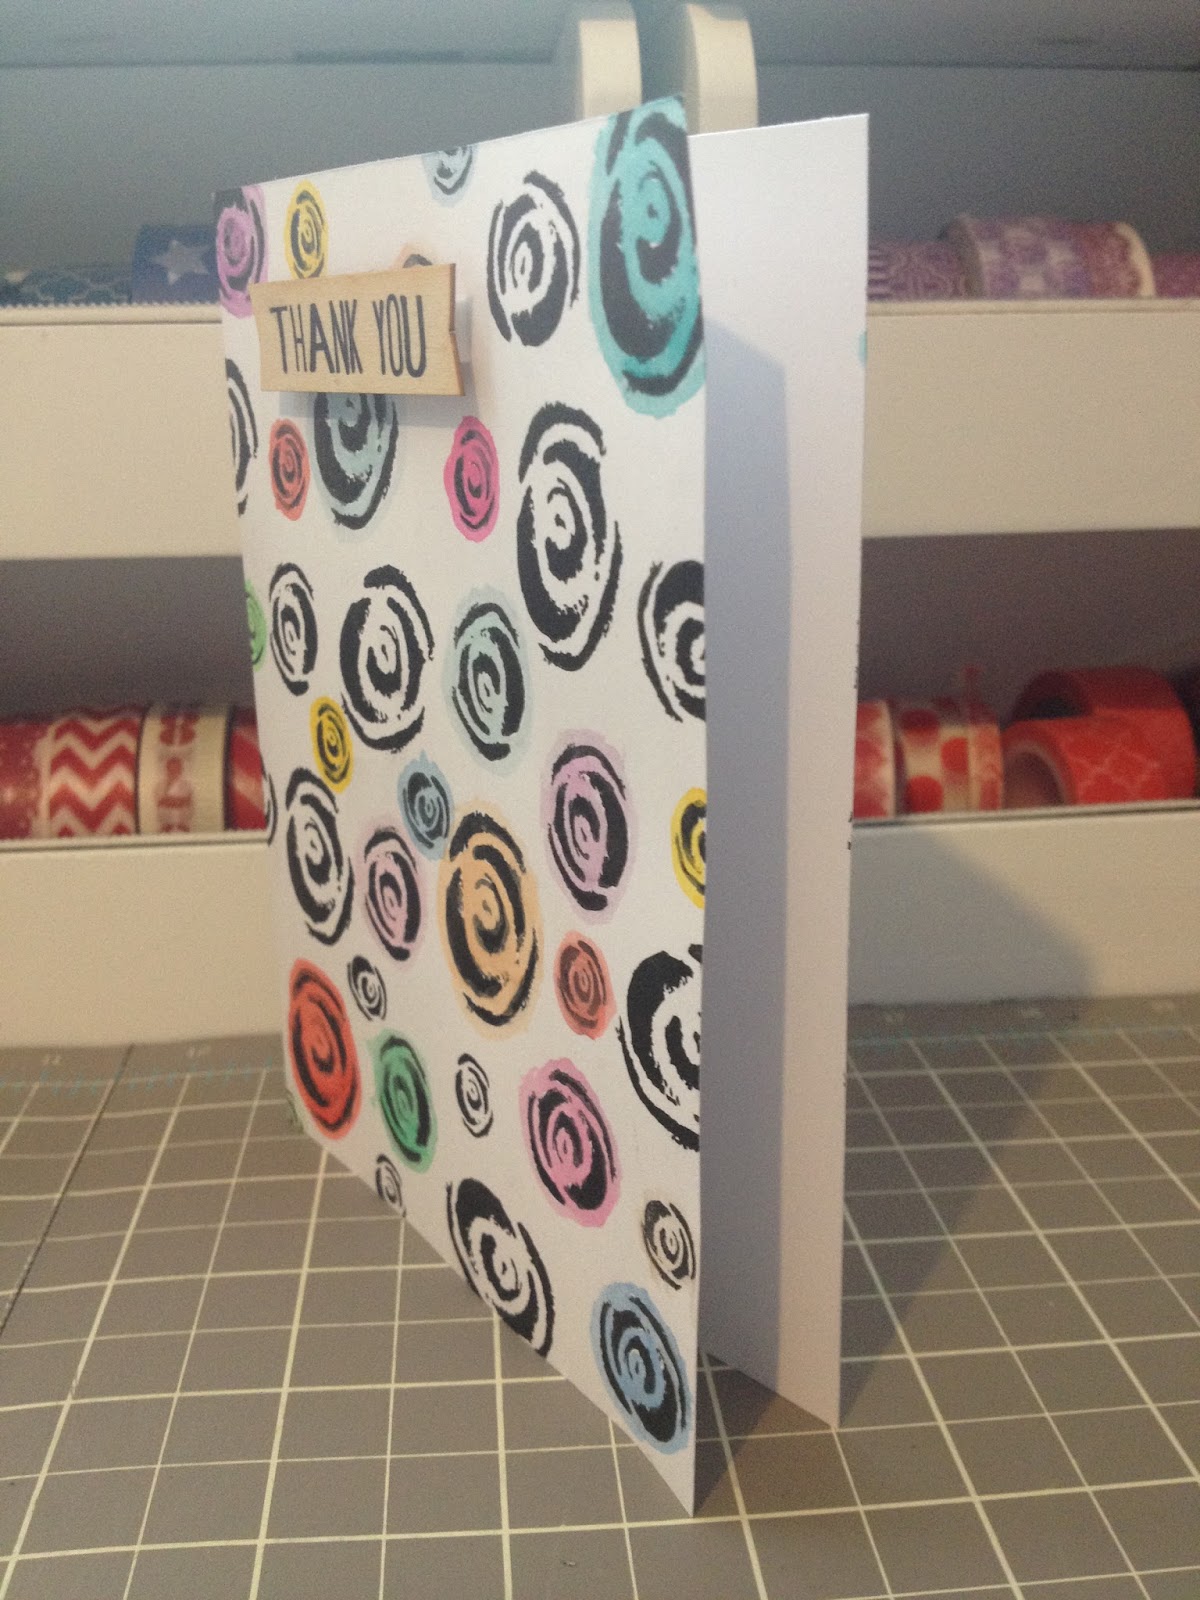
I stamped this on the blue/white stripe paper, stamped the hearts in the jar in a variety of colors, then added the sentiment over top. I used the circles stamp set to add a bit of interest to the background, and tied some crochet cotton around the top of the jar.


I wanted to use the sentiment from the Jar Stamp outside of the jar as well, so I stamped it on a tag. My one goal is to use at least a small portion of each paper in the kit, and given that I was stumped by the diamond paper, I added it behind the tag to make the tag stand out against the background paper.


Here I used the stamps from the Yeats add-on. I love this Cyan color so much! I want to use it for everything I possibly can. I also added some little of the star gems, and a heart stamp. This was so obviously inspired by the member gallery because I don't think I could have come up with something so pretty on my own.


I wanted to use the Circle stamp with a hear in it as a background because I feel like one heart isn't enough. I randomly stamped them all over this card, and added "with love" in my favorite cyan color, and called it done.


I saw a card in the member gallery, that was similar to this, but it had stitching on it. I tried to machine stitch something similar, but it didn't turn out, so instead I drew lines to make the "hey" look the opposite of the rest of the card.


This card happened somewhat by accident. (It happened after the faded gem card), In the member gallery is this card, and I wanted desperately to try something similar. At first the colors I used, didn't work AT ALL. So I stuck with one color and used multiple shades of it to make it a monochromatic ombre. I trimmed it on an angle, mounted it on the grey paper, and added some crochet cotton.


Another card inspired by the member gallery. Didn't quite turn out how I wanted, but I wanted to try and make use of at least one of those plastic gems, and a wood veneer.


I hate this card so terribly much. But I included it because I know there are going to be those cards that you hate beyond words, but at the same time, you made it, and perhaps someone will like it....or not, and that's okay too. I'm not even quite sure what I was going for when I made this, but I don't think it was what it ended up being.


This was the first card I made with the kit. I was so excited about the gems, and there were like a dozen cards in the member gallery that did something similar to this, so I just had to try it. I love how it turned out!


Another card that I don't like. I trimmed the first page of the paper stack, you know the one that shows all the papers and who made them. I trimmed it so I had a small portion of each of the papers and made it a banner, and adhered it to the bottom, but it looks like it doesn't belong because it goes with nothing.


This happened completely on accident. I stamped the purple one first, and the bottom half didn't stamp quite as dark as the top half. Then I got the idea to make two-tone gems!


I added ink to the top half of the gem in a darker shade, and the bottom half got a lighter shade and then I stamped it. I made sure the ink overlapped a little bit to get the full fading effect. To do this with three colors (like the hooray card from earlier) you start at the top and stamp about half of it with the darkest color. Then you stamp the bottom, going a little above the halfway point with the mid-tone color, and then stamp the bottom portion with the lightest. You can also do this the opposite way, or with completely different colors.


I used the little diamond stamp to make a background, and stamped "you're a gem" with silver ink on the blue paper, and attached it to the grey/white stri[e and adhered both to the card with foam squares.


There were so many papers in this card kit, that I knew I could never use them all, but this card helped me make use of a few of them. I love the colors of this card and how simple it is.


Originally this card just said hello. But Jon told me it was missing something, so I added the lines to the bottom, and the extra sentiments.


My favorite card from this kit, (aside from any using the jar stamp). I love the blog of papers in the middle so much.


Thanks for coming by to see these cards I made. I hope they inspire you to make a bunch of cards. Now I wish I had some time to work on more cards, perhaps unrelated to the card kits.

Have a great day!
-Alexandria

17/11/2014

Studio Calico: Sandlot Card Kit

Today I'm sharing the cards I made using the Sandlot Card kit, and the Squints add-on from Studio Calico. This is the August card kit, and just last week I got the add-on. As I was using the kit, and browsing the member gallery for inspiration, it made me want the Squints add-on and luckily they still had some available, so I bought one before they sold out. I'm so glad I did. It helped me make more cards with the kit.

I could have made more cards, but I felt that they would have ended up looking very similar if I did, and so I limited myself to just these. The extra paper and embellishments were added to the rest of the leftover embellishments and papers from other card kits.


This one is my absolute favourite from this kit. Just circles, sequins, little wooden stars, and some gold mist.


This was inspired by a Sunday sketch. I left off the giant embellishment, and made the strips of paper a little wider.


This was inspired by one from the member gallery. I have terrible hand writing so I used the stamp that came in the kit, and now I wish I'd just tried to handwrite it. The thanks is a little larger than I would have liked.


I love this gumball machine! I wish I'd used a different background paper for this so that the "you're so sweet" on the bottom showed up better.


I greatly dislike this card. I made it at work, and in my head it looked awesome, but I realize now that using just the circle paper might not have been the best choice.


I love how this one turned out. So many gumballs.


I added watercolors to the background paper to highlight the words and only put ink onto the "you're so" portion of the "you're so sweet" stamp. I added a few enamel dots from the Squints add-on (should have done it more random).


My style is extremely simple, and that's why I love this one. I have no idea how those two rose stamps are supposed to line up, but I'm fine with how they turned out.


I'm so proud of this one. I wasn't at all sure that my ruffle would turn out, and although you can see the thread in a dew places, it still looks okay. I love that it's a little messy and not perfect. Makes the thread showing seem intentional.


This was real simple. Just cut some 1/2" strips in colours to match the top/bottom paper and put them in a way that no two similar colours were together.


Stamped some flowers, cut them out, arranged them around the card. A couple of them were adhered with foam tape to make them pop, and the roses were just stamped directly onto the card.


I had so much fun making this card. I stamped a bunch of roses, let them dry and then painted a few with watercolours. It was totally random, but Jon tells me there's a slight pattern to it.


This one has a lit less flowers, but I added the paper and the wood veneer anyway. I'm not sure how I feel about it.


Thanks for coming by to see these cards! Some of them I finished up just yesterday! Crazy, I know. I'm trying to get through a couple more card kits, and then my goal is to start making some from my stash. I miss doing that!

Have a great day!
-Alexandria